|
This is the second post in a two-part series about tattooing your Jersey calf; please click here to read the first post.
I've found that tattooing takes at least two people (one to restrain the calf and one to tattoo), so I always ask one of my brothers or sisters to give me a hand. A younger sibling often tags along as well and hands me my pliers, ink, et cetera as I ask for them. If no brothers are handy when you tattoo, I recommend that you ask a friend or neighbour to assist you. Prepare your calf The first step is restraining your calf. I'm always amazed at how strong a two-week-old heifer is, so strong brothers are very handy. 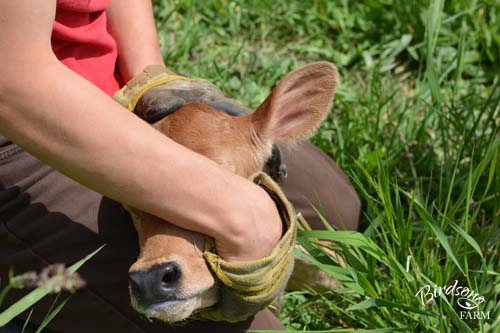
Alexandra is restrained and ready for tattooing.
After your calf is restrained, you will want to clean the inside of her ears with a soft cloth or paper towel wet with plain water, and then with a cotton ball or pad wet with the antiseptic of your choice. Calf ears are often quite waxy (that's a good thing—waxy ears are a sign of high butterfat milk in her future), so it might take a bit of work to get them squeaky clean.
Tattoo! Your herd tattoo letters go in your calf's right ear, and the animal number and year letter go in your calf's left ear. Remember that the calf's ears are reversed when you are facing her (her right ear is on your left and vice versa). Traditionally, the tattoos were placed between the two ribs in the calf's ear, but now that Canadian farmers are required to tag dairy cattle before they leave their farm of birth many farmers place the tattoos above the top rib and reserve the space between the two ribs for the tags. I place all my tattoos above the top rib; this way the tattoo isn't in the way when I tag the calf at a later date, and if the tags ever rip out the tattoo is not damaged. 
Alexandra's ear before washing. You can clearly see the two ribs in this photo; the tattoo will be placed between the top rib and the top of her ear.
Most farmers will apply the ink to the ear before tattooing; I always tattoo first and then double check the letters and readability of the tattoo before I apply the ink. This way if I make a mistake while I'm tattooing, it's easy to fix—I skip the ink and retattoo in a couple weeks.
When your calf's ears are dry, double check your tattoo digits and position your tattoo pliers, remembering to watch out for the big blood veins (if you hit one of the big veins the blood can damage your tattoo; the small veins are fine). When the tattoo pliers are in position, I gently squeeze them so that the positive ear release is touching the ear, but the tattoo needles are not. Ask your assistant to keep the calf from squirming while you squeeze the pliers, and then count to three...one...two...three...and squeeze on three. Squeeze the pliers firmly (you'll feel a little "crunch") for a deep, clear tattoo. The positive ear release on the Stone tattoo pliers releases the ear from the tattoo needles and keeps the tattoo crisp and clear with no scratches. 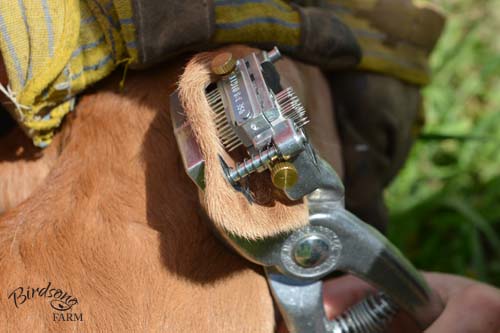
All set and ready to squeeze in one...two...three!
Check your handiwork, and if everything looks good apply ink to the tattoo. I rub the ink in with my thumb and a soft toothbrush that I've reserved for tattooing and keep with my tattoo kit. You may want to apply ink two or three times to get good coverage—you want to make a tattoo that lasts the lifetime of the cow. Leave the extra ink on; it will dry out and flake off.

Checking the tattoo...

...and applying the ink.
When you are finished, repeat on the other ear, remembering to change your tattoo digits. I always tattoo the right ear with my herd letters first, and then tattoo the left ear with the animal number and year letter.
Congratulations! You've finished tattooing your first calf! You'll find that tattooing gets easier every time—it took me two and a half calves (five ears) to stop cringing with the "crunch". 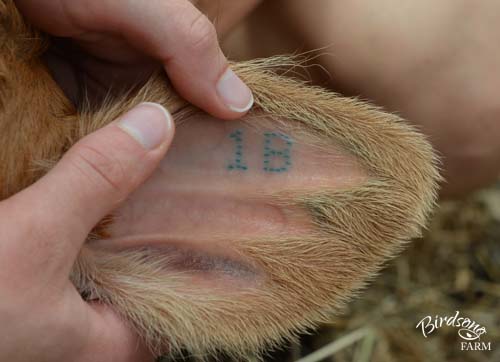
Alexandra's completed tattoo two weeks later.

0 Comments
Your comment will be posted after it is approved.
Leave a Reply. |